Sleep training: The gift that keeps on giving

Sleep training Baby E early on was seriously the best thing that my husband and I did. Baby E had terrible colic, so she hardly slept from birth to about 12 weeks. I don’t know who was more tired – us or Baby E? I’m tempted to say it was my husband and I, but seeing how well Baby E responded to sleep training makes me think she was actually the more tired one.

At around 10 weeks we decided to give sleep training a try. Before diving in, we got the green light from the pediatrician to make sure that Baby E was physically, emotionally and developmentally ready for it. Doctor said go for it, so off we went!

But, wait; which method? Who knew there were so many schools of thought on how to get your kid to sleep. Don’t they just…sleep? I guess not; apparently, falling asleep is a learned skill. After comparing notes with a lot of my “mom friends,” we decided to go all in with the “Cry It Out” (CIO) approach. With the CIO method, you let babies cry for a specified period of time before offering comfort so they can learn to self-soothe to sleep. Slightly harsh; yes, but seemed effective. We figured we weren’t getting much sleep anyway, so what was there to lose!

We did a gentler version of CIO where we let Baby E cry for only 5 minute increments. Traditional CIO methods suggest that you gradually increase the time in which the baby is crying until you’ve hit the maximum wait time. Honestly, the only reason why we chose to stick with 5 minutes is because our neighbor’s window is right next to Baby E’s nursery and we didn’t want to disturb them. Every baby is different so don’t pay too much attention to the wait times, just do what you are comfortable with….but stick to it! Here’s what we did:

Step 1: Put baby down in the crib when he/she is tired, but still awake. This is important since the ultimate goal is to train them to put themselves to sleep. Don’t rock your baby to sleep? That’s crazy talk, I know. I recall veteran moms telling me that’s what they did and I just assumed they were either lying or had some super baby. But, ladies and gentlemen, it can be done!

I found that Baby E had a “sweet spot” of tiredness (too awake and she’d want to play, but too tired and she got super fussy) where if I hit it just right it made a huge difference. After studying Baby E’s tired cues for a couple of days (and through trial and error), we concluded that her “sweet spot” was after three yawns and eye rubbing. Every baby is different and have their own unique cues, so keep a look out for what your little one does. Plus, sleepy babies are sooo cute!

Step 2: Give your babe a few gentle pats on the tummy (or whatever your baby finds most comforting), leave the room, and set the timer for 5 minutes. Baby E would have already started crying at this point, but that’s okay — be strong and keep on walkin’!

Step 3: Wait out the full 5 minutes before going back into the room to reassure the baby. It’s hard, but it’s important to the process that you don’t pick up your baby when soothing, even if they are crying. I also found that not making eye contact helped. Use a soft voice and gentle patting/stroking until they calm down. Then walk away and reset the timer for another 5 minutes.

Step 4: Repeat until your little bambino has hitched a ride into Dreamville! How many times you want to repeat the cycle is totally up to you and your comfort level. Consistency is the critical factor here so you have to find the cadence that’s most comfortable for you and your little one. With Baby E, it usually took about four to five rounds before she fell asleep. If she was crying inconsolably we decided that there wasn’t much “learning” going on, so we’d pick her up to soothe at that point.

Step 5: If your baby wakes up mid-nap or sleep, repeat the entire process.

All babies are different and have totally unique dispositions, but I will say that I was quite impressed with how fast sleep training worked. I’ve heard this from other parents as well. It took about a week or so until we saw a major difference in Baby E’s sleeping abilities. What went from endless rocking and gently putting her down like a live grenade, went to simply plopping her down with minimal fussing/crying plopping before she was fast asleep. Hallelujah!

Sweet dreams, Baby E...

Sweet dreams, Baby E…

Consistency was the key to our success – training every day, every nap, and sticking to the wait times. Here are some additional tips that really helped us:

  • Rather than increase the wait times like traditional methods suggested, we would reset the clock every time Baby E stopped crying for more than 30 seconds. We did this as we got more comfortable with CIO and to help Baby E push healthy comfort boundaries.
  • Start with naps as opposed to bedtime. There’s just something less daunting about a baby wailing during the day versus night time. Also, babies who get efficient naps during the day sleep better at night, so it makes sense to start at the source, if you will. Also, there are less neighbors to disturb during the day.
  • Put a lovie or blanket that smells like mom (or the primary caretaker) in the crib. Keep the item of out of reach from baby for safety reasons. I slept with her lovie for a couple of days and hung it in the corner of the crib where she could not reach. Sounds a bit hokey, but babies have incredible sense of smell and a familiar scent will be calming for them.

Sleep training can be like the monkey on your back — something you want/have to do, but just don’t want to do it. It’s not easy, it’s an emotional process, and it’s just not a fun activity to do with your baby. Look at sleep training like a band-aid you just need to rip off. Once you do, it’s like the gift that keeps on giving!

58341494

Breastfeeding and its challenges: My story

Here’s another thing they don’t tell you while you’re pregnant – breastfeeding is not really that intuitive and it’s really hard to get the hang of. This hidden truth is sneaky because just about every new mom I know with a two to four-week old baby says the same thing. If so many new moms struggle with it, why don’t we talk about the challenges more ahead of time?

I found breastfeeding to be a challenge from the very beginning. Specifically, Baby E didn’t have a strong latch (and I didn’t produce milk until about day 3 or so). I’ll never forget the moment when the doctor at the hospital told me that Baby E was starving and her mouth was “bone dry,” a sign that she wasn’t getting enough milk. My heart sank. Two days in and I’m already starving my child. Worse was the realization that I was failing at the one thing that was required of me. My failure was made concrete by the fact that her birth weight dropped by 11% (it’s normal for newborns to lose up to 10%). I cried…and I cried some more. Shortly after the tears subsided, I had one of those moments that I imagine a losing boxer would have inside the ring with their coach. My coach, my husband, told me not to accept defeat, but to figure out a strategy and put on my proverbial boxing gloves (aka nursing bra), so we can win this breastfeeding fight!

First thing, I opted to supplement Baby E with formula. I have no issue with formula. It’s a wonderful alternative to breast milk, and it makes me furious when people judge – but that’s an entirely different topic. Second, I immediately made appointments with the hospital’s lactation consultants (LC) to learn proper latch and feeding techniques. I wish I could sit here and say that seeing a LC at this point made all the issues go away. It didn’t. I did everything they told me to do, but it just didn’t come easy. Was her mouth too small? Was something wrong with her? Was something wrong with me? Was her lip or tongue tied (they said no, but I’m pretty sure she has an upper lip tie)? Seriously, you’d think by now “survival of the fittest” would have evolved the human species enough to not have these issues at birth.

I’m going to do a major fast forward here so I can tell you how I came to my current situation. In short, Baby E’s latch never improved. I just improvised. I would seriously shove my boob in her mouth, stretch her lips open, and squeeze milk into her mouth until she formed a sufficient latch. Breastfeeding was like the albatross around my neck, but at some point “my way” became the normal. Despite a bad latch, she did get much better at breastfeeding, but each feed was stressful. She was also growing and gaining weight beautifully even impressing her pediatrician, so I thought we were in good shape.

Around 3 months or so, Baby E started becoming more alert and more easily distracted. She’d be on the boob for about 2 mins before latching off. She would cry bloody murder when I tried to latch her back on. I did a weigh-feed-weigh to see exactly how much she was getting within 2 mins. She was only getting an ounce to an once-and-half. I broke down crying when I realized this. Knife to the heart. I noticed that her growth slowed down a bit as well. Knife digging deeper into the heart. She clearly needed more milk to sustain her growth as she was getting bigger. Earlier she was probably getting enough milk with a shorter than average breastfeeding session; but now, it clearly wasn’t cutting it.

I saw numerous LCs and Baby E would either breastfeed like a champ in front of them (clearly, the “aim to please gene” didn’t skip this generation) or the LC would tell me that it was perfectly normal for a 3-month baby to nurse for just 2 mins; and that I should “feed on demand” more often. I’m going to be totally honest now: I just didn’t want to “feed on demand.” I didn’t want to be a prisoner to breastfeeding. I know many new moms who don’t mind this, but it just wasn’t realistic for me. If she was feeding 2 mins per feed, getting an ounce each time, I would have to feed her about 24 times a freaking day! Not to mention, she went back to becoming miserable on the boob, likely due to reflux. It wasn’t a pleasant experience for either of us. So, I decided it was time to pump and bottle feed. I came to the realization that knowing she was getting a full/healthy feed with the bottle was more important than the act of breastfeeding.

For the first couple of weeks of bottle feeding, I still struggled with it emotionally. I felt like a failed. I was also paranoid that I wasn’t getting the maximum amount of bonding, so I breastfed for the first morning feed (when she typically breastfeeds okay) for however long she’d stay latched, and then supplement with a bottle of breast milk. I honestly don’t think it makes a difference at all whether you breastfeed or bottle feed from a “bonding” perspective, but whatever, I did it to “calm my nerves” and it worked for me.

Fast forward another five month to today…I have a very healthy breastmilk-bottle fed baby who is happy and thriving, with no signs of suffering a shortage of breastfeeding-bonding experience. As an added bonus, I saw a profound improvement on her sleeping (slept through the night by three months) and reflux issues. Oh yeah, most importantly, I was happier and didn’t feel the weight of anxiety that came with breastfeeding.
Like everyone says, you know in the end everything will be just fine regardless of what you do – whether it be bottle feeding vs. breastfeeding or breast milk vs. formula. It’s a shame that mothers have to feel disappointment because they have to use the bottle (or formula).

Bottom line: Happy mom = happy baby [drops mic]

10624917_10152352032632773_8829101401900359598_n

99 problems and the bottle is one

If it’s not one thing, it’s another. When you’re a new parent, fresh issues and challenges sprout up like weeds. At around 4-and-a-half months, the problem du jour a lot of mothers seem to face is the Bottle Strike. Your baby was doing fine taking a bottle or two from your significant other (to give mom a rest with a glass of vino) for months, but all of a sudden he/she hates it. And, this conveeeeeeeeniently happens right around the time you’re supposed to go back to work. WHYYYYYY? I swear, babies get a kick at throwing curve balls. But, I’m onto your evil antics, baby; and I’ll outsmart you!

I’ve heard that around this time babies really start developing an understanding of their environments and start processing likes/dislikes to certain things. They’ve grown out of their auto-drive state and have realized that the contraption you are feeding them milk from is not a boob…and they don’t like it! Of course, some lucky moms have babies who are mellow and don’t hate the bottle – they probably still realize though that it’s not actually a boob. This all make sense seeing that there are so many awesome bottles out there that try to mimic the real deal, like Tommee Tippee, Comotomo, and the Joovy Boob bottle to name a few. Outsmarting Baby E with these fake-boob replacements didn’t work, so I had no choice but to “train” her to take a bottle.

Baby E’s bottle strike was intense – she would scream and cry the moment she saw the bottle coming near her. Desperately trying to find a solution, I came across this awesome video from Isis Parenting (which apparently is no longer around) that offers a multitude of great tips and techniques.

What worked best for Baby E was the IBBM method, where you introduce the bottle in between natural breaks during breastfeeding, stopping to go back to the breast when baby starts to fuss. This method really seemed to help Baby E get over her aversion of the bottle. It took about 2 weeks of consistent IBBM to notice that the moments on the bottle were getting longer, less intrusive and scary for Baby E. Then I went back to giving her a bottle once a day. It still took some time for Baby E to “like” the bottle, but at least she was taking it. Winning!

Alongside IBBM, I also fed her in the infant swing facing me. If she wasn’t going to get the real deal, it seemed like she was comforted by looking into my eyes and face. (Make sure to check the recline angle of the swing though – babies should be fed in a gentle 45 degree angle to minimize air being swallowed). Baby E is a bit high maintenance – I had to get the expressed breast milk just the right temperature for her to like it in the bottle – a tad on the hotter side of warm. I also tried different shapes of bottles and nipples, but she seemed to like the Dr. Brown’s bottles the best.

When it’s time to go back to work, make sure you show your nanny or daycare your methods. It will put you at ease, but most importantly, it’ll be much easier for your baby to deal with the transition. You definitely want your baby singing…

57948787


The colicky baby tool kit

You hear so much about the joys about being a new mother that no one really warns you about colic, the inconsolable crying that lasts for many many hours a day. Baby E had colic…in a major way. Pediatricians say most commonly it starts around the second week of life, but for Baby E, colic reared its ugly head in the second DAY of life. Sigh.

While there is no one absolute cure for colic (awesome!), there are ways to keep it maintained (and your sanity in check). My husband and I tried and bought just about everything that was available, so here are some of the best and effective tools that helped Baby E. I write this post in hopes that my experience and recommendations help you and your little one. 

1) Yoga ball. If you have a crying baby stop what you are doing and get a yoga ball! Colic or not, the best way to soothe a crying baby is to bounce. With Baby E’s endless crying fits all that deep bouncing was turning my quads into those of an American Gladiator’s. Not cute.

Thanks American Gladiators for the image!

Thanks American Gladiators for the image!

There’s something about the deep bouncing that’s soothing for the baby – maybe it mimics how it felt like in the womb? For the budget conscious parent who is torn about splurging on a glider, get a yoga ball instead and save yo’ money. I have many friends who get far more mileage out of their $15 yoga ball than any fancy rocking chair. Just sayin’…

2) Gerber Soothe Colic probiotic drops. Like many babies with colic, Baby E also suffered from gas and reflux discomfort. I’m not a doctor, so I don’t know all the facts about these “friendly bacteria” gems, but probiotics basically help aid in moving things along in the gastrointestinal system. Since adults use probiotics for the same reasons, I figured I’d give it a shot with Baby E (after I consulted her pediatrician of course). I’ll say with confidence that this was a game changer for Baby E – within a week, I saw a major difference in her level of crying and overall discomfort.

There are several brands of probiotics out there, but you want to make sure that the bacteria is specifically, Lactobacillus reuteri (L. reuteri). Also, as a heads up, the Gerber and the BioGaia brands are the same thing – Gerber bought the BioGaia probiotics.

3) Rock n Play Sleeper. This portable, light weight bassinet puts a sleeping baby at an incline, which is very helpful for babies with gas, reflux or other GI issues. In full disclosure, this thing is a little controversial generating debate as to whether a baby should be sleeping in this for extended periods of time….but, it worked for Baby E. Honestly, when you have a baby with colic, you’ll do anything. Even if it means breaking the rules or doing something that the “perfect mother handbook” tells you not to do. Happy baby = happy mom. End.Of.Story. Oh, btw, there’s a vibrating mode on these bad boys that Baby E loved!

Baby E catching some Zzz's in the Rock n Play

Baby E catching some Zzz’s in the Rock n Play

If you don’t want to clutter your space with yet another baby item, just roll up some towels and place them under the mattress of the crib or bassinet. The incline really helps in alleviating gas and reflux pains.

4) Sound machine. Babies love the sound of vacuum cleaners, static or driving. Weirdos.

I once actually had the mini vac running while she was sleeping. Slept like a baby.

I once actually had the mini vac running while she was sleeping. Slept like a baby.

Similar to the yoga ball/bouncing theory, I think these sounds remind them of when they were nestled up inside mamma’s belly. Come to think of it, maybe colicky babies are just pissed off about having been evicted from the womb, so they are retaliating by crying a lot….I digress

There are tons of white noise machines for babies out there, but why pay money when you can get them for FREE on your iPhone of iPad!? The Sleep Pillow app, available on iTunes, has over 70 different sounds from light to medium rain, mother’s heartbeat, to hair dryer. Crap, it even has one called “beach resort hammock” – and it sounds diviiiiiine.

5) Infant carrier or sling. Baby carriers are clutch for any new parent who wants to be mobile. But, for colicky babies who want to be carried all the time, a carrier is a lifesaver. I don’t care how strong you are, a 7-8 pound baby will get heavy after a while. For Baby E, I think it was the skin-to-skin closeness that set her at ease. Confession: I would often wear her shirtless to “maximize” on the skin-to-skin. You gotta do what you gotta do, amirite!??

We tried out several carriers. We used the Baby Ergo with infant insert when she was first born – it was fine, but I think she was just too small for that carrier. I had heard great things about the K’Tan wrap, so I tried that next. It was a little cumbersome to put on, but once she was in it, she seemed to like it.

Baby E snug as a bug in the K’Tan. God, I look SO tired.

We’re currently using the Baby Bjorn now that she’s bigger, and that seems to work best for both me and Baby E. At the end of the day, any baby carrier that is comfortable for both you and the baby will do just fine.

6) Cranial Sacral Therapy. CST is “a gentle, noninvasive form of bodywork that addresses the bones of the head, spinal column and sacrum.” The thought is that the gentle massage of these areas will help in alleviating the points of stress, pressure and pain that may be leading to the colic/crying. I know what you are thinking: this is crazy; I know. It was so totally out of my comfort zone (it’s very hippy dippy), but it worked for Baby E. I was feeling pretty helpless and the glimmer of a promise that this would help improve things was reason enough for me!

When I went to the specialist in San Francisco, my first reaction was, “dude you are just touching my child’s face and head. I could have done that myself!” But, the reason why people paid him the big bucks was clear…it actually worked! Within just the first visit, I noticed a definite increase in her sleep duration, decrease in spitting up and gas discomfort, and crying. Even my husband who’s usually a totally downer about these types of things was impressed. He was a believer too – hallelujah!

As a heads up, check with your pediatrician to make sure that CST is the right move for your bambino. Also, call your insurance to see if you get partial or full coverage, as it’s not the cheapest service in the world.

Much like what our pediatrician told us, Baby E’s colic lasted for about 12 weeks before it kind of just suddenly turned a corner. Dealing with Baby E’s colic has been one of the hardest things I’ve ever had to do deal with. It’s tough, but it will end. I’ll promise you that.  Hang in there – you are doing amazing!

If you have any additional tips for colic, share them with the rest of us by leaving a comment. Sharing is caring!

California Maternity Leave: How to milk it

UPDATE 2021: This post has been updated to reflect the expansion of the California Family Rights Act (CFRA). Effective January 1, 2021, SB 1383 expanded CFRA to apply to private employers with five or more employees (regardless of the number of employees within a 75-mile radius). To be eligible for CFRA, an employee must also 1) have completed at least 12 months of employment with the company, and 2) have worked at least 1,250 hours of service within the past year. Furthermore, SB 1383 repealed California’s New Parent Leave Act (NPLA) effective December 31, 2020.

UPDATE 2020: This post has been updated to reflect the increased benefit period of Paid Family Leave (PFL). 

UPDATE 2018: This post has been edited to reflect the addition of the New Parent Leave Act (NPLA), as well as increased benefit amounts for SDI and PFL. Read this to get the full scoop! 

There are seven wonders of the world. Wrong! There are eight; the final one being the mysterious maternity leave. When I found out I was pregnant one of the things that made me jump for joy (next to loving the alien bump growing inside me, obvi) was the prospect of setting off into maternity leave bliss. I felt like I had paid my dues working in stressful PR jobs throughout my career, so I knew I wasn’t going to be shy about really maximizing my maternity leave benefits.

But this was all much easier said than done since figuring out how to milk the system was incredibly hard to find. Pinpointing concrete information on maternity leave was like setting out on a mission to discover El Dorado. No joke guys, I was seriously OBSESSED with figuring out all the details of maternity leave. Also, I was convinced that my employer was short-changing me several weeks of precious leave, so off to scouring the internet I went.

First, as a disclaimer, I am not an attorney, and I do not provide legal advice. I now hold a credential as a Certified Leave Management Specialist, and received the SHRM California Law HR Specialty Credential. 

IMPORTANT: The following applies to employees who are eligible for Pregnancy Disability Leave (PDL) AND California Family Rights Act (CFRA). Eligibility requirements for PDL and CFRA are discussed in the post.

Let’s get right to it. The bottom line is that for any healthy preggers (i.e. no need for extended bed rest during pregnancy or reasons to be out of work due to complications after birth), at minimum, you can get 22 or 24 weeks of maternity leave (22 weeks for vaginal delivery and 24 weeks for c-section). Now, not all of that time is paid (I’ll get to that later), but what this means is that you get 22 or 24 weeks of job protection.

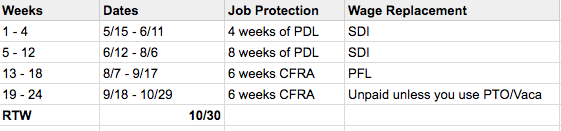
There are many ways to explain maternity leave, but I think it’s easiest to explain it in chronological order. Here’s a chart I drew up (don’t mind the chicken scratch writing) and I’ll explain each step. I should mention that this chart is based on me having had a c-section on May 12.

My maternity leave timeline. I started my maternity leave on April 16, 4 weeks before my due date. I gave birth via c-section on May 12, which ended my PDL/FMLA on July 7 (8 weeks after 5/12). The end of the PDL/FMLA kicked in my 12-week CFRA, giving me a go-back-to-work date of September 29.

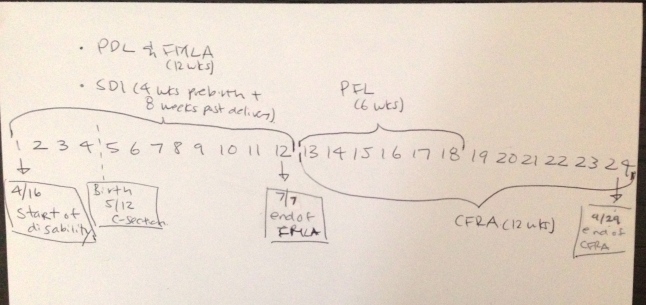
My 24 week maternity leave timeline. I started my maternity leave on April 16, approximately 4 weeks before my due date. I gave birth via c-section on May 12, which ended my PDL on July 7 (8 weeks after 5/12). At the end of PDL, my 12 weeks of CFRA kicked in, giving me a go-back-to-work date of September 29.

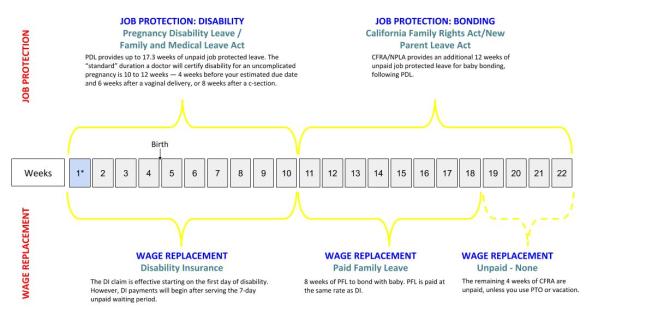
For a timeline for a typical, uncomplicated pregnancy and vaginal birth, check out this baby (pun intended).

Copy of PDL_FMLA + CFRA Timeline_updated (2)

1) Starting your disability

First, decide when you want to start your maternity leave. Some take a week or two off before baby is expected to arrive, while others work literally right until the moment they are saddled up in the stirrups. (I once had a boss who actually sent me an email while in labor.) Whatever you decide, know that you can start your maternity leave 4 weeks before your estimated due date! Whaaat? No way!? Yep, this is true!

Pregnancy Disability Leave (PDL) starts the first day of your maternity leave, and provides up to 17.3 weeks of job protected leave for the purpose of pregnancy, childbirth, and other related conditions. Before y’all get excited over the 17.3 weeks, note that you don’t automatically get all 17.3 weeks of leave. The actual duration of your PDL must be certified by your doctor, but the “default” duration of PDL for a healthy, uncomplicated pregnancy/childbirth is 4 weeks before birth and 6 weeks after for a vaginal delivery or 8 weeks after for a c-section (I’ll provide more detail on the post-birth portion later, as well as information on what happens if you have complications).

The only eligibility requirement for PDL is that you work for an employer with 5+ employees. There is no additional eligibility requirement, such as minimum hours worked or length of service.

PRO TIP: The 4 weeks before delivery is a “use it or lose it” situation. You don’t get to tack it on later, so if your individual situation allows for it USE IT. Some of my colleagues balked at me taking 4 weeks off before my due date saying I’ll get bored. Psshhh. Only boring people get bored, but on the real tip, the extra rest is amazeballs and I (assume this is the norm for all preggos) got HUGE in the last 2 weeks. Also, taking off 4 weeks before your due date will NOT affect your “go back to work” date, since that date is calculated from your delivery date – not when you started maternity leave. I had a lot of people tell me that they would rather spend the extra 4 weeks with their newborn rather than take off early for maternity leave — not the case, mah friends!

It’s important to note that the 4 weeks before due date is just the “default” start time that a doctor could certify disability for pregnancy. Should you have any complications during your pregnancy (i.e. high-risk issues, preeclampsia, bed rest, etc), your doctor can write you out earlier than 36 weeks or at any point during your pregnancy your doctor feels medically necessary. Any time taken before birth simply gets deducted from your 17.3 weeks of PDL “bank.”

So, what happens if you have a high-risk pregnancy and your doctor certifies you “disabled” super early, like at 28 weeks? Let’s say you give birth at 40 weeks via c-section, that would mean that upon birth you would only have 5.3 weeks of PDL remaining (17.3 – 12), but you still need 8 weeks of PDL for post birth recovery. In this scenario – where you exhaust all of your PDL but still experiencing a disability – you may be eligible for additional leave under CFRA (if eligible) or through “reasonable accommodation” under ADA/FEHA, which can provide additional time off.

As you patiently wait the arrival of your precious offspring, your job will be protected under the PDL and you will be paid 60% or 70% of your weekly wages through State Disability Insurance (SDI). [Check out this post for the 411 on how to calculate your SDI benefit amount.]

Wage replacement through SDI begins on the first day of your PDL; however, there’s a mandatory unpaid 7-day (calendar days) waiting period that you must serve before receiving your SDI benefits. You will not be paid during the waiting period, but you can use whatever form of paid leave (sick, PTO, vacation) to pay yourself before SDI kicks in. The first payable day is the 8th day of your claim. And, SDI will continue through the entire duration that you are “disabled” by pregnancy and childbirth.

As a side note, you’ll often see references of PDL and FMLA combined, which can make things super confusing. The reason why they often come as a pair is because they run concurrently – they both start the minute you begin your maternity leave. However, in the context of maternity leave in California – don’t even worry about FMLA. FMLA simply runs in the background of PDL since PDL (state law) supersedes FMLA (federal law). Plus, PDL is much more generous than FMLA, giving you up to 17.3 weeks of leave versus 12 weeks under FMLA. Further, the eligibility requirements for PDL are more lenient than FMLA. The only eligibility criteria for PDL is that you work for an employer with 5+ employees. With FMLA, you must work for an employer with over 50+ employees in a 75 mile radius, you must have worked at your employer for at least a year, and you must have clocked in 1,250 hours of service prior to the start of your leave. So, thanks California for looking out for pregnant mommas!

2) You had your baby!

Okay, so after 4 loooong weeks your beautiful baby has finally entered the world. Hooray!

Once your baby is born, your PDL will continue for an additional 6 weeks for a vaginal birth or 8 weeks if you had a c-section; and you’ll continue to get wage replacement through SDI (still at around either 60 or 70% of your normal wages).

Your doctor will determine when you are cleared from disability. While this is typically 6 or 8 weeks after birth, should you have any complications – physical or mental (i.e. postpartum depression) – your doctor can certify an extension to your PDL, and your SDI benefits will be extended along with it.

3) Your baby is now 6 or 8 weeks: Now it’s time to bond

Once you’ve completed your 10 or 12 weeks of PDL (4 weeks before birth + 6/8 weeks after birth) – or more importantly, when your doctor has certified you no longer disabled by your pregnancy or childbirth – the clock gets reset with an additional 12 weeks of unpaid, job-protected leave under the California Family Rights Act (CFRA) to bond with your baby. In order to be eligible for CFRA, you must meet ALL of these requirements:

  • Your employer has at least 5 employees.
  • Have worked for your employer for at least 12 months.
  • Have worked at least 1,250 hours of service within the past year.

During CFRA leave, you will be paid partial wage replacement through Paid Family Leave (PFL) at the same rate as your SDI, but here’s the kicker…only for 8 weeks. This means that while you have 12-weeks of job protection under CFRA, you’ll get partial pay for only 8 of those weeks. Bummer. The remaining 4 weeks are unpaid, but you can apply any unused vacation or PTO time to offset being unpaid for the remainder of your leave. Also, you don’t need to take your 8 weeks of PFL all at once. You can break it up and take it in hourly or daily increments if you want. However, do note that CFRA stipulates that your employer may require that the minimum duration of leave is 2 weeks, or unless otherwise approved by your employer.

4) Your maternity leave has ended and you’re back at work

Okay, what I’m about to say next is important! Your “return to work” (RTW) date is determined by when your CFRA ends.

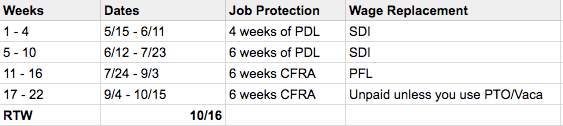
Example 1: Anna starts her maternity leave at 36 weeks, has her baby vaginally on June 12, and has no complication after birth. Here’s what her timeline and return to work date would look like:

[NOTE: The charts below have not been updated with the increased 8-week benefit duration of PFL. Sorry! But you get the idea, yeah?]

Screen Shot 2018-02-14 at 10.14.09 AM

Example 2: Oh no, Anna ended up getting an emergency c-section!

Screen Shot 2018-02-14 at 10.39.31 AM

I won’t sugar coat it; it’s not easy going back to work after being out for 22-24 weeks. But, you make do and just like all things that suck at the beginning, once you get into the swing of things, you will find joy balancing out work and family life.
Hope this all makes sense. If you have any questions or issues, leave a comment!

P.S. BTW, turned out that my employer WAS wrong about when I was supposed to go back to work. Muahahaha! Knowledge is power, friends; knowledge is power!

If you have questions regarding California maternity leave, or would like more information on how I can provide individualized support to help maximize your maternity leave, please visit Maternity Leave 411.

If you’re NOT eligible for FMLA/CFRA, read this

Baby needs a passport

Who’s got two thumbs and ready travel? Baby E has gotten herself some official documentation and ready to explore the world!

photo-2

Based on my experience of getting a new passport after tying the knot (changed my last name), I wasn’t too jazzed about doing it again for Baby E. Ugh…having to wait in line for hours at the crowded Passport Agency while nursing a screaming new born. No bueno. With a little research, I pretty much figured out the easiest and fastest way to get your rugrat a passport of his/her own!

Here’s how!

Step 1: SKIP THE PASSPORT AGENCY! Make an appointment at your local post office – shorter lines + less people = happy mom. You can find your pick of an official Passport Acceptance Facility here.

Step 2: Fill out this form – the DS-11 Application for US Passport. Pro tip: Fill it out online and then print. If you’re like me and have penmanship of a serial killer (or can’t write within those small squares), this will come in handy.

**** Both parents (or guardians) must appear with the baby. If you’re going solo, no fear – just fill out form DS-3053: Statement of Consent – Issuing a Passport to a Minor Under Age 16. You’ll have to get it notarized, so plan ahead for that.

Step 3: Go to Wallgreens (or any place that can take and/or develop photos on the spot) to get passport pictures taken. The good people at the Wallgreens Photo department were very helpful in taking the picture. Best to go when baby is in a good mood. The passport is valid for 5 years, so do your babe a solid and go when they are photo ready!

photo

Step 4: Get all the documents ready for action.

  • The completed DS-11 form
  • Notarized Statement of Consent form, if applicable
  • Your baby’s headshot, aka 2″x2″ passport photo
  • U.S. Birth Certificate – this doc kills two birds with one stone: Evidence of US Citizenship AND Evidence of Parental Relationship. Heads up – this needs to be an ORIGINAL COPY. Once the passport is processed they will mail back your birth certificate!
  • Your drivers liscense or passport for ID
  • A check in the amount of $80. Heads up – Passport Acceptance Facilities do NOT take credit cards. If you’re in a jam, pay an extra $25 to get it expedited. Plan on paying with a check for this too, as not all Passport Acceptance Facilities take plastic for this either.

Step 5: PASSPORT Day! You get to take an oath on behalf of your babe too! So official, but that’s how we gotta roll!

Happy traveling!

P.S. We got Baby E’s passport in about 4 weeks.

It’s a New Year!

Happy New Year, everyone. I hope everyone had a restful holiday. I start this new year with a resolution….blogging.

I’m a first time mom to baby E (pic below…I mean, seriously, right? I just can’t), so I suspect much of this blog will be about baby stuff.

DSC_0812


But, I’ll throw in some general musings for good measure too.

So join me on my blogging adventures!

(Okay, in full disclosure, this first post sucked, but I need to get something in the books…)