Top 10 ways to survive the first few weeks

A friend of mine just had a beautiful baby girl! Natural birth. 9 pounds, 3 ounces. Yowza! My friend is one bad ass motha….!

Even though it’s only been 10 months since Baby E was born, I actually forgot how hard the first couple weeks are. I recall other moms noting this when Baby E was just weeks old. I remember thinking, “really? you forget? how on earth can you forget the painful breastfeeding sessions or the excruciating sleep deprivation?” But, alas, it’s true; you do forget. How? Evolution, my friends! Humans have been programmed to undergo selective memory loss during this time, so that new offspring can be conceived and brought into this world.

Anyhow, with my amazing friend in mind, here are 10 ways that helped me survive the first few weeks!

1) If you’ve decided to breastfeed, see a lactation consultant sooner than later. Even if you’re a breastfeeding prodigy, accept the fact that breastfeeding is hard work. Whether it’s the pain, the fatigue, or baby being fussy, breastfeeding is not always unicorns and rainbows. A certified lactation consultant can provide you with valuable information on proper latch techniques, different ways to position baby, and solutions to common issues like engorgement, over/under production, or nipple pain. Above all, seeing a lactation consultant will give you a much needed confidence boost in knowing you aren’t doing it totally wrong.

2) Get comfortable breastfeeding gear. Breastfeeding does a real number on your lower back due to all the hunching. Having adequate breastfeeding equipment can make a huge difference in your overall comfort. These were some of my major lifesavers: My Brest Friend breastfeeding pillow (I highly recommend this one versus the Boppy pillow), a nice hefty pillow to put behind your back (the key is to be upright as possible), an adjustable step stool, and nipple cream (Earth Mama Angel Baby was my fave).

3) Bottle feed when you need a break. As previously stated, breastfeeding is tough. Your nipples are being pulled and manipulated in ways that you never thought possible. That said, it’s okay to close up shop from time to time. Warm up a bottle of expressed milk or formula and let dad, partner or a friend feed the baby. And while they’re is doing that, take a moment for yourself and do whatever your heart desires! Sleep, take a shower, manicure – whatever. Do it!

And on that note, if you feel as though formula is the better option for your baby – do that! There are many different varieties of formulas available — all of which perfectly fit the needs of growing newborns.

4) Don’t be afraid to tell your friends what to do. You’ll hear over and over again, “let me know if you need help with anything?” And over and over again most new moms will say, “thanks. I will,” but they don’t! I was guilty of this, but in retrospect I wish I wasn’t. If a friend is asking you this quesiton with sincerity, there is no shame in simply accepting their offer. Ask them to come over and vacuum, clean the house, make a simple meal, get you some groceries, etc.

….And, if they weren’t being genuine, joke’s on them – muahahahaha!

5) Rely heavily on delivery services. Now is not the time to be “mom of the year.” The first couple of weeks is all about short cuts. Take advantages of the many services out there like:

  • Meal delivery: Munchery (used this about 3 times a week!), Spring, Spoonrocket,
  • Grocery delivery: Safeway.com, Instacart (ummmm, used daily!), Google Shopping Express, Amazon Fresh
  • Food delivery: Seamless, Postmates, Grubhub, Caviar
  • Cleaning service: Homejoy (seriously, god send!)

* Not all of these services may be available in your area. I was lucky enough to have had Baby E in San Francisco – the land of internet start ups! No, really, there IS an app for that! 

6) Don’t stress out about not “sleeping when baby sleeps.” I got this tip so many times from people, and each time it made me want to scream! I’m one of those people who just can’t fall asleep at a drop of a hat – no matter how tired I am. Rather than have a rejuvenating slumber, I would just lay there thinking I should be sleeping. And it would stress me out! So, instead, I give you this tip: do whatever relaxes you the most while baby is sleeping!

7) Get help, but not from a friend. As tip #4 reminds us, it’s not easy to accept help from friends. You don’t want to be a bother, I get it. So, take out the emotions and just hire help if needed.

Baby E was a super colicky and the first couple weeks were probably one of the hardest experiences that my husband and I ever faced. Rather than take friends up on their offer to watch Baby E for a couple of hours while we got rest, we decided to hire a night doula/nurse. Best decision ever. Even if it was just for a night or two, it gave us the respite we desperately needed — without the guilt or worry that we were imposing on friends or family. Double win!

8) If you’re sad, be sad, but get the help/support you need. Don’t ever be ashamed of feeling low, sad or depressed after having a baby. Postpartum blues are real and super common, but it’s critical that you seek the help or support that you need.

I definitely felt the “baby blues” soon after having Baby E and sought the support of a therapist to talk out my concerns, anxieties and feelings. Just saying my feelings out loud made a huge difference in stabilizing my emotions during the super stressful time of new motherhood. Be kind, good, and honest to yourself.

9) Join a mommy group. There’s just something undeniably comforting about knowing that you’re not crazy! For real though; it’s so nice to know that someone else is going through the exact same hellish sleep deprivation as you, or that sudden outbursts of tears are totally normal, or that it’s completely okay to feel like you have no idea what that hell you are doing.

Joining a weekly mother’s group was truly the best thing I could have done for myself and Baby E. The mother’s group I joined (CPMC’s Newborn Connection’s mother’s group) became my weekly “sanctuary” where I was – without judgement – able to vent about my husband (marriage quarrels happen to the strongest of couples), cry about how exhausted I was feeling, celebrate a new milestone that Baby E was exhibiting, or learn a pretty amazing tip on how to get baby to sleep. Without a doubt, my mother’s group helped get me through the toughest times of the newborn phase.

There are many local mother’s groups out there, but they tend to differ on style/vibe, so just make sure that it’s the right fit for you.

10) Say out loud “Things will get easier.” And repeat. This is exactly what I said to my friend last night, who was having a particular hard night with her newborn. I told her that things will just get easier. It really does.
 

Transporting Liquid Gold: Moving frozen breast milk using dry ice

Yikes! I haven’t updated my blog in months! These past couple of months have been CRAZY with travel, a family wedding, and oh yeah….we moved from San Francisco to Los Angeles. This cross-California move brings me to the topic of my next post: transporting your precious boob juice from point A to point B.

Confession: I’m a bit of a breast milk hoarder. I mean, pumping is WORK, so I best not be waisting that sh*t! I’ve tried to donate my extra milk, but because I had taken fenugreek to keep my supply up I was unfortunately denied as a donor. So, I have a fairly large stash of breast milk in the freezer.

Driving down to LA usually takes about 6 hours. Add a 10 month old to the mix (diaper changes and feeding stops), and you’re looking at tacking on about an extra two to three hours to the drive. Sigh. Figuring out how to safely move all my breast milk safely down to LA was probably one of my top priorities. Here’s what we did….

Step 1: Find some dry ice. You can typically find dry ice at party novelty shops. Or if you live in the Bay Area, check out Ben’s Dry Ice. These people are awesome! They deliver the dry ice to your house and they are super helpful in figuring out how much you need to buy. Be sure to get blocks of dry ice and dry ice pellets.

Step 2: Get some ice chests. You can use those coleman-style ice chests, but those can cost you about $50! Instead, look on Craigslist for anyone giving away heavy-duty styrofoam ice coolers for free. With so many people subscribing to services like Blue Apron, it shouldn’t be too difficult to find them. [Heads up: Don’t get those cheapo, flimsy styrofoam ice boxes – the ones you need should be about 3/4 inch think.]

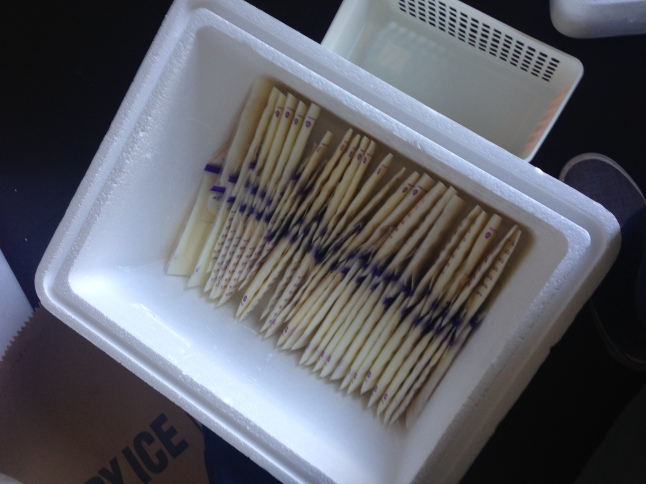
Step 3: Now you’re ready to pack your ice boxes! Put a layer of frozen milk on the bottom. I lined them up like this:

photo 3 (1)

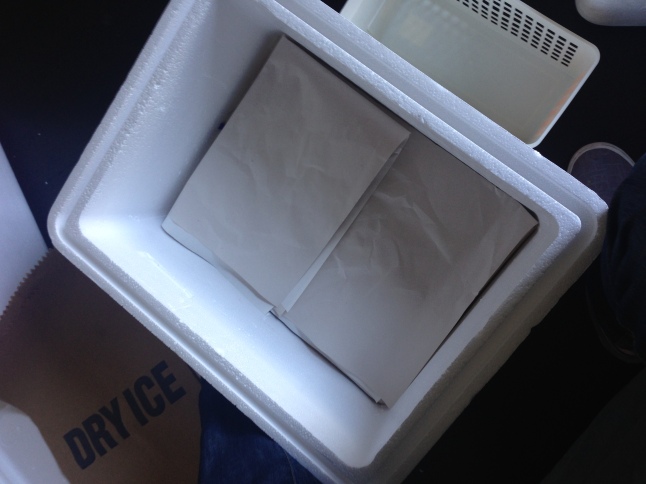
Step 4: Add a layer of insulation. You can use just about anything — towels, cardboard, newspapers, etc. Since I was already in the process of packing and had extra packing paper lying around, I used those. Voila!

photo 4

Step 5: Add another layer of frozen breast milk just like you did the first layer. Fill any empty air space with the insulating material. Like so!

photo 3 (2)

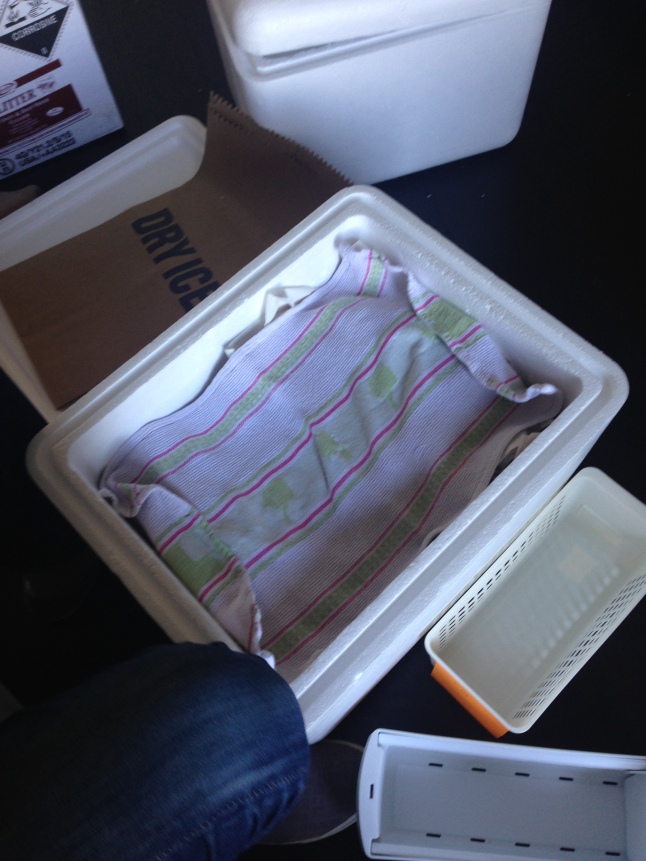
Step 6: Now that your breast milk is packed, it’s time to get it primed for the dry ice. But first, protect your precious milk with some more insulating material. I used several layers of kitchen towels.

photo 4 (1)

Step 7: It’s time for the dry ice! (Cue techno music: untz untz untz). Using protective gloves or oven mits, CAREFULLY place the blocks of dry ice and then sprinkle a generous amount of the pellets to fill any openings. Seriously, dry ice is no joke – take the proper precautions, people!

photo 4 (2)Step 8: Fill up any air space with more insulating material. Close the box and don’t open it until you get to your destination!

photo 5There you have it — with these steps, you can guarantee your breast milk will arrive to your destination still completely frozen! Hooray!


Sleep training: The gift that keeps on giving

Sleep training Baby E early on was seriously the best thing that my husband and I did. Baby E had terrible colic, so she hardly slept from birth to about 12 weeks. I don’t know who was more tired – us or Baby E? I’m tempted to say it was my husband and I, but seeing how well Baby E responded to sleep training makes me think she was actually the more tired one.

At around 10 weeks we decided to give sleep training a try. Before diving in, we got the green light from the pediatrician to make sure that Baby E was physically, emotionally and developmentally ready for it. Doctor said go for it, so off we went!

But, wait; which method? Who knew there were so many schools of thought on how to get your kid to sleep. Don’t they just…sleep? I guess not; apparently, falling asleep is a learned skill. After comparing notes with a lot of my “mom friends,” we decided to go all in with the “Cry It Out” (CIO) approach. With the CIO method, you let babies cry for a specified period of time before offering comfort so they can learn to self-soothe to sleep. Slightly harsh; yes, but seemed effective. We figured we weren’t getting much sleep anyway, so what was there to lose!

We did a gentler version of CIO where we let Baby E cry for only 5 minute increments. Traditional CIO methods suggest that you gradually increase the time in which the baby is crying until you’ve hit the maximum wait time. Honestly, the only reason why we chose to stick with 5 minutes is because our neighbor’s window is right next to Baby E’s nursery and we didn’t want to disturb them. Every baby is different so don’t pay too much attention to the wait times, just do what you are comfortable with….but stick to it! Here’s what we did:

Step 1: Put baby down in the crib when he/she is tired, but still awake. This is important since the ultimate goal is to train them to put themselves to sleep. Don’t rock your baby to sleep? That’s crazy talk, I know. I recall veteran moms telling me that’s what they did and I just assumed they were either lying or had some super baby. But, ladies and gentlemen, it can be done!

I found that Baby E had a “sweet spot” of tiredness (too awake and she’d want to play, but too tired and she got super fussy) where if I hit it just right it made a huge difference. After studying Baby E’s tired cues for a couple of days (and through trial and error), we concluded that her “sweet spot” was after three yawns and eye rubbing. Every baby is different and have their own unique cues, so keep a look out for what your little one does. Plus, sleepy babies are sooo cute!

Step 2: Give your babe a few gentle pats on the tummy (or whatever your baby finds most comforting), leave the room, and set the timer for 5 minutes. Baby E would have already started crying at this point, but that’s okay — be strong and keep on walkin’!

Step 3: Wait out the full 5 minutes before going back into the room to reassure the baby. It’s hard, but it’s important to the process that you don’t pick up your baby when soothing, even if they are crying. I also found that not making eye contact helped. Use a soft voice and gentle patting/stroking until they calm down. Then walk away and reset the timer for another 5 minutes.

Step 4: Repeat until your little bambino has hitched a ride into Dreamville! How many times you want to repeat the cycle is totally up to you and your comfort level. Consistency is the critical factor here so you have to find the cadence that’s most comfortable for you and your little one. With Baby E, it usually took about four to five rounds before she fell asleep. If she was crying inconsolably we decided that there wasn’t much “learning” going on, so we’d pick her up to soothe at that point.

Step 5: If your baby wakes up mid-nap or sleep, repeat the entire process.

All babies are different and have totally unique dispositions, but I will say that I was quite impressed with how fast sleep training worked. I’ve heard this from other parents as well. It took about a week or so until we saw a major difference in Baby E’s sleeping abilities. What went from endless rocking and gently putting her down like a live grenade, went to simply plopping her down with minimal fussing/crying plopping before she was fast asleep. Hallelujah!

Sweet dreams, Baby E...

Sweet dreams, Baby E…

Consistency was the key to our success – training every day, every nap, and sticking to the wait times. Here are some additional tips that really helped us:

  • Rather than increase the wait times like traditional methods suggested, we would reset the clock every time Baby E stopped crying for more than 30 seconds. We did this as we got more comfortable with CIO and to help Baby E push healthy comfort boundaries.
  • Start with naps as opposed to bedtime. There’s just something less daunting about a baby wailing during the day versus night time. Also, babies who get efficient naps during the day sleep better at night, so it makes sense to start at the source, if you will. Also, there are less neighbors to disturb during the day.
  • Put a lovie or blanket that smells like mom (or the primary caretaker) in the crib. Keep the item of out of reach from baby for safety reasons. I slept with her lovie for a couple of days and hung it in the corner of the crib where she could not reach. Sounds a bit hokey, but babies have incredible sense of smell and a familiar scent will be calming for them.

Sleep training can be like the monkey on your back — something you want/have to do, but just don’t want to do it. It’s not easy, it’s an emotional process, and it’s just not a fun activity to do with your baby. Look at sleep training like a band-aid you just need to rip off. Once you do, it’s like the gift that keeps on giving!

58341494

99 problems and the bottle is one

If it’s not one thing, it’s another. When you’re a new parent, fresh issues and challenges sprout up like weeds. At around 4-and-a-half months, the problem du jour a lot of mothers seem to face is the Bottle Strike. Your baby was doing fine taking a bottle or two from your significant other (to give mom a rest with a glass of vino) for months, but all of a sudden he/she hates it. And, this conveeeeeeeeniently happens right around the time you’re supposed to go back to work. WHYYYYYY? I swear, babies get a kick at throwing curve balls. But, I’m onto your evil antics, baby; and I’ll outsmart you!

I’ve heard that around this time babies really start developing an understanding of their environments and start processing likes/dislikes to certain things. They’ve grown out of their auto-drive state and have realized that the contraption you are feeding them milk from is not a boob…and they don’t like it! Of course, some lucky moms have babies who are mellow and don’t hate the bottle – they probably still realize though that it’s not actually a boob. This all make sense seeing that there are so many awesome bottles out there that try to mimic the real deal, like Tommee Tippee, Comotomo, and the Joovy Boob bottle to name a few. Outsmarting Baby E with these fake-boob replacements didn’t work, so I had no choice but to “train” her to take a bottle.

Baby E’s bottle strike was intense – she would scream and cry the moment she saw the bottle coming near her. Desperately trying to find a solution, I came across this awesome video from Isis Parenting (which apparently is no longer around) that offers a multitude of great tips and techniques.

What worked best for Baby E was the IBBM method, where you introduce the bottle in between natural breaks during breastfeeding, stopping to go back to the breast when baby starts to fuss. This method really seemed to help Baby E get over her aversion of the bottle. It took about 2 weeks of consistent IBBM to notice that the moments on the bottle were getting longer, less intrusive and scary for Baby E. Then I went back to giving her a bottle once a day. It still took some time for Baby E to “like” the bottle, but at least she was taking it. Winning!

Alongside IBBM, I also fed her in the infant swing facing me. If she wasn’t going to get the real deal, it seemed like she was comforted by looking into my eyes and face. (Make sure to check the recline angle of the swing though – babies should be fed in a gentle 45 degree angle to minimize air being swallowed). Baby E is a bit high maintenance – I had to get the expressed breast milk just the right temperature for her to like it in the bottle – a tad on the hotter side of warm. I also tried different shapes of bottles and nipples, but she seemed to like the Dr. Brown’s bottles the best.

When it’s time to go back to work, make sure you show your nanny or daycare your methods. It will put you at ease, but most importantly, it’ll be much easier for your baby to deal with the transition. You definitely want your baby singing…

57948787


Baby needs a passport

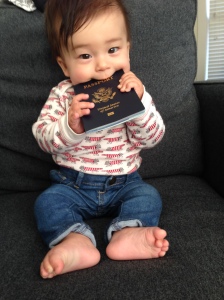
Who’s got two thumbs and ready travel? Baby E has gotten herself some official documentation and ready to explore the world!

photo-2

Based on my experience of getting a new passport after tying the knot (changed my last name), I wasn’t too jazzed about doing it again for Baby E. Ugh…having to wait in line for hours at the crowded Passport Agency while nursing a screaming new born. No bueno. With a little research, I pretty much figured out the easiest and fastest way to get your rugrat a passport of his/her own!

Here’s how!

Step 1: SKIP THE PASSPORT AGENCY! Make an appointment at your local post office – shorter lines + less people = happy mom. You can find your pick of an official Passport Acceptance Facility here.

Step 2: Fill out this form – the DS-11 Application for US Passport. Pro tip: Fill it out online and then print. If you’re like me and have penmanship of a serial killer (or can’t write within those small squares), this will come in handy.

**** Both parents (or guardians) must appear with the baby. If you’re going solo, no fear – just fill out form DS-3053: Statement of Consent – Issuing a Passport to a Minor Under Age 16. You’ll have to get it notarized, so plan ahead for that.

Step 3: Go to Wallgreens (or any place that can take and/or develop photos on the spot) to get passport pictures taken. The good people at the Wallgreens Photo department were very helpful in taking the picture. Best to go when baby is in a good mood. The passport is valid for 5 years, so do your babe a solid and go when they are photo ready!

photo

Step 4: Get all the documents ready for action.

  • The completed DS-11 form
  • Notarized Statement of Consent form, if applicable
  • Your baby’s headshot, aka 2″x2″ passport photo
  • U.S. Birth Certificate – this doc kills two birds with one stone: Evidence of US Citizenship AND Evidence of Parental Relationship. Heads up – this needs to be an ORIGINAL COPY. Once the passport is processed they will mail back your birth certificate!
  • Your drivers liscense or passport for ID
  • A check in the amount of $80. Heads up – Passport Acceptance Facilities do NOT take credit cards. If you’re in a jam, pay an extra $25 to get it expedited. Plan on paying with a check for this too, as not all Passport Acceptance Facilities take plastic for this either.

Step 5: PASSPORT Day! You get to take an oath on behalf of your babe too! So official, but that’s how we gotta roll!

Happy traveling!

P.S. We got Baby E’s passport in about 4 weeks.